Heating Calculators

  • home
  • liquid heating calculators
    • power/time oil volumes
    • power water flows
    • time water volumes
  • advertise!
  • heating blog

How to calculate the kW required to heat a volume of water in a particular time.

August 28, 2021 by Jamie Bristoll

Informational content provided by Jamie at Immersion Heaters UK Ltd.

Click for our online water heat up time calculations page HERE.

One question which comes up time and again is “How many kW do I need to heat up my tank?”

Or phrased a different way, “How long is it going to take my ? litres of solution to raise ? °C using my ? kW heater?”

If we can calculate the volume of water and the required temperature rise, we can answer these questions using the following formula.

It is used to calculate the power of heating element needed to heat a specific volume of water by a given temperature rise in 1 hour.

volume in litres x 4  x temperature rise in degrees centigrade / 3412

(4 being a factor and 3412 being a given constant)

for example 100 litres of water, to be heated from 20ºC to 50ºC, giving a temperature rise of 30ºC would give –

100 x 4 x 30 / 3412 = 3.52

meaning that the water would be heated in 1 hour by 3.5kW of applied heat.

Also we can use this information to extrapolate both ways.  To heat the same water volume in half the time (30 minutes) would need twice the heating power, ie, 7kW.

Converesely, if we only use half the heating power, 1.75kW, it will take twice as long to heat up to desired temperature, ie, 2 hours.

If we only have a 1kW element available, we will expect a heat up time circa 3.5 hours.

Also we can use this formula as the basis of similar calculations for heating oil.  Generally speaking, oil heats up in about half the time of water, due to its viscosity & density.  However, oil requires a much lower watts density element than water, as described here in the “How to choose an oil heater” article.

Another variant of this formula, given here at the excellent website Sciencing.com gives the following varaint of the formula & subsequent explanation-

Pt = (4.2 × L × T ) ÷ 3600

Calculate Kilowatt-Hours

Calculate the kilowatt-hours (kWh) required to heat the water using the following formula: Pt = (4.2 × L × T ) ÷ 3600. Pt is the power used to heat the water, in kWh. L is the number of liters of water that is being heated and T is the difference in temperature from what you started with, listed in degrees Celsius.

Solve for Thermal Power

Substitute in the appropriate numbers into the equation. So imagine you are heating 20 liters of water from 20 degrees to 100 degrees. Your formula would then look like this: Pt = (4.2 × 20 × (100-20)) ÷ 3600, or Pt = 1.867

Divide by Heater Element Rating

Calculate the amount of time it takes to heat the water by dividing the power used to heat the water, which was determined to be 1.867 with the heater element rating, listed in kW. So if your heater element rating was 3.6 kW, your equation would look like this: heating time = 1.867 ÷ 3.6, or heating time =0.52 hours. Therefore, it would take 0.52 hours to heat 20 liters of water, with an element with a rating of 3.6 kW.

Which made better sense in my little brain when I put a multiplication sign between P and t, allowing 30+ year old math class memories to clarify that if you move the Power (P) or the Hour (t) to the other side of the equals symbol, we gotta divide by that number also. “Change the side, change the sign” Thanks Mr Phipps, some of it actually stuck, hope you are still above ground, happy & healthy.

P x t = (4.2 × L × T ) ÷ 3600

…which doesn’t usually “show” as t = 1 hour, as in kW(1)h.

Hope you found this useful.

Any feedback, suggestions, improvements, etc, PLEASE COMMENT, I promise to read ’em.

And if you want elements or immersion heaters, please call Jamie on 07897 246 779or visit ImmersionHeaters.uk

Filed Under: calculations Tagged With: calculate kw required to heat water, calculate kw to heat water, calculate time to heat up water, calculate time to heat water, calculation, formula, heating element, heating water calculation kw, how many kw to heat water, how many kw to heat water calculator, how many kwh to heat water, how to calculate kw to heat water, how to calculate power required to heat water, how to calculate time to heat water, how to calculate water heating time, immersion heater for brewing, kw needed to heat water, kw required to heat water, kw to heat 1 litre of water, kw to heat water, kw to heat water calculator, temperarture rise, time to heat water calculator, water, water heat up time, water heating calculator, water heating calculator kw, water heating time calculator, watts to heat water calculator

What is a heating element?

October 4, 2022 by Jamie Bristoll

For the full shilling version, see the web authority on everything, Wikipedia, or an informative, if uninspiring, site referenced on the wiki page.

The extremely abridged version – its an electrically powered tube which applies direct heat to liquids and gases.

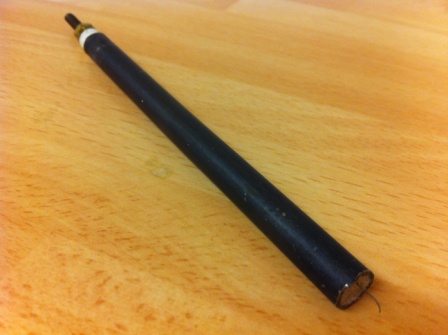
And finally, the Immersion Heaters UK version. Here is one I chopped up earlier –

<[youtube https://www.youtube.com/watch?v=ZV1yuBxdA4Q&w=560&h=315]

Video for those that are allergic to reading.

The top end is the terminal, sometimes a spade connection, but more usually a thread, washer and bolt combination, geared at holding the electrical connection, ie, incoming wire, in place.

Below the nuts is a white plastic plug which serves as a seal against ingress of moisture and also to hold all of the important bits inside in the middle of the tube, away from the sheathing.

The sheathing material is the outer housing, the solid casing, usually made of a metal, in this case Incoloy 800, a stainless steel variant. This serves to encase and protect the important bits, protecting them from whatever is being heated, ie, oils, chemicals, etc.

The white compacted powder inside the tube is magnesium oxide powder, which serves as an insulator against electrical leakage, but as a conductor of the heat generated by that electrical current.  It serves to hold the filament wire centrally within the tube so that contact with the sheathing material is all but impossible.

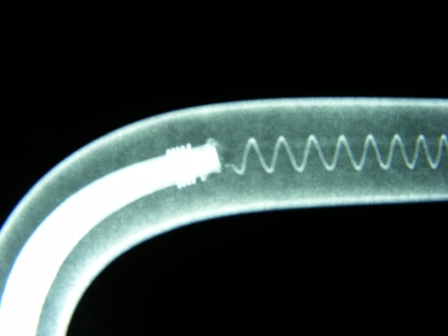
Finally, the tiny wire seen protruding at the bottom of the picture is the filament wire which creates the heat in the core of the element.  Usually Nickel Chromium, this converts electricirty very efficiently into heat, with only a little wastage as light, as with the filament of an old light bulb.  Whilst it is straight in the picture above (due to being hacksawed), under normal circumstances it would be coiled centrally in the magnesium oxide, as shown below, in this very cool x-ray.


The picture above also helps to explain the terms cold end, cold section, dead length, etc.  The bit before the wiggly filament, that looks a bit like a hose pipe, is the other end of the terminal pin, the nuts & washers electrical connection as described above. Usually mild steel, this section is not going to create a great deal, if any heat, and so this is termed the cold section.  All elements have two terminals, one at either end, to complete an electrical circuit, and both ends will have a cold section of 2 – 6″ dependent on the application.

This length would have to be subtracted from the element length when calculating watts density, ie, a 48″ 1000W element with 6″ colds has only 36″ active length (48″ – 6″ – 6″ = 36″), so the watts density of this element is 1000 / 36 = 28w/in².

So that is a plain heating element, but what about finned heating elements?

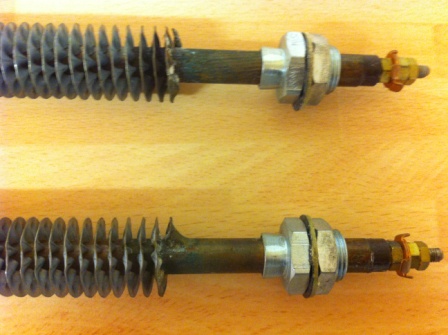
Mainly for use in air duct heaters, finned heating elements are merely plain elements as detailed above, but with finning added by a very clever machine.


This allows for better dispersion of the heat, basically by creating more surface area of heated element in the same available space.

Thanks for your interest. Any comments, feedback, additional information, please feel free to contact Jamie via our website..

Filed Under: heating element Tagged With: finned heating element, heating element, incoloy 800, plain heating element, rod heater, watts density

IP Ratings explanation.

August 28, 2022 by Jamie Bristoll

Ingress Protection (IP) and what it means

The IP Code (or International Protection Rating, sometimes also interpreted as Ingress Protection Rating) consists of the letters IP followed by two digits and an optional letter. As defined in international standard IEC 60529, it classifies the degrees of protection provided against the intrusion of solid objects (including body parts like hands and fingers), dust, accidental contact, and water in electrical enclosures. The standard aims to provide users more detailed information than vague marketing terms such as waterproof.

The digits (usually numerals) indicate conformity with the conditions summarized in the tables below. For example, an electrical socket rated IP22 is protected against insertion of fingers and will not be damaged or become unsafe during a specified test in which it is exposed to vertically or nearly vertically dripping water. IP22 or 2X are typical minimum requirements for the design of electrical accessories for indoor use.

First Digit: Solids

The first digit indicates the level of protection that the enclosure provides against access to hazardous parts (e.g., electrical conductors, moving parts) and the ingress of solid foreign objects.


Filed Under: Uncategorized

What is an immersion heater?

August 22, 2022 by Jamie Bristoll

[youtube https://www.youtube.com/watch?v=oroE6nVFzo0&w=560&h=315]

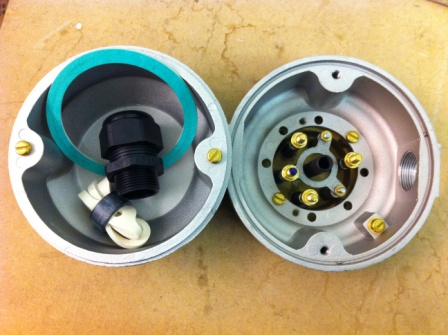
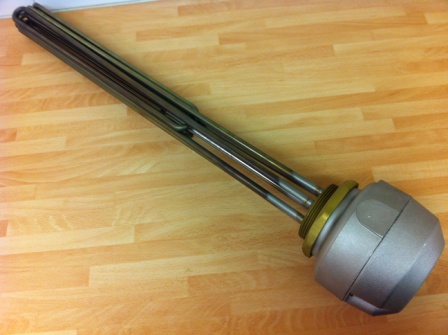
An immersion heater is, simply put, a number of elements, usually 3, elements, a screwplug and a IP rated terminal box to protect the connections.

element
3 of these (preferablynot chopped up) and

screwplug sizes
…one of these, drilled through, for the elements to be braised or welded into…

Terminal box
…and one of these to attatch to the screwplug, to house the terminals and wiring.

And, in the best Blue Peter traditions, here’s
one we made earlier…

 Immersion Heater
PII Industrial Immersion Heater

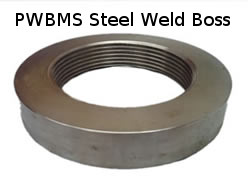
The heater is then screwed throught the side of the tank using a weld boss…

weld boss
Mild steel weld boss

Mild steel tanks require mild steel weld bosses, and likewise, stainless steel tanks require horribly priced stainless steel weld bosses. I’ll tell you what brass bosses are used for when I find out.

Filed Under: general information, Immersion Heater Tagged With: component parts, immersion heater, pictoral explanation

Our updated website is up, running and ready for viewing.

August 9, 2022 by Jamie Bristoll

Following a great deal of hard work and patience on the part of our Website Team at Counsell.com, our new WordPress website is ready to view at processheatingservices.com

There is a lot more content on the site, much more product detail, and hopefully, all laid out in a way that a first time visitor in search of a UK based supplier of immersion heaters or heating elements, can drill down through the content to find information about exactly the product that they are after.

For example, someone in search of a 1kW finned heating element, may land on our website from natural listings or from adverts, on the ‘heating elements‘ page, they would then select ‘Finned Heating Elements – PEF Range (250W – 7kW)’ where they would then find a list of the various lengths and kW ratings available as finned elements, from which they would select 1kW, taking them to the PEF Range – Finned Heating Elements 1000w / 1kW page, which lists the various lengths of element that are available with a 1kW rating (20″, 24″, 26″, 30″, 32″, 34″, 36″, 40″, 42″, 48″, 54″, 60″, 66″, 72″, 78″, 84″, 90″, 96″, 104″, 114″, 120″, 132″, 144″, 170″, 180″). They can then choose the length which best suits their application, then ring us on the phone numbers ever present in the right hand bar, to place their order.

Also new additions are many of the photographs, showing much greater detail of terminal boxes, element looping, element diameter, etc.

PIH - HEAVY DUTY INDUSTRIAL IMMERSION HEATER TERMINAL BOXPIH - HEAVY DUTY INDUSTRIAL IMMERSION HEATER ELEMENTPIH - HEAVY DUTY INDUSTRIAL IMMERSION HEATER TERMINAL BOX

Again, these are for the benefit of new customers, to get a feeling for the dimensions, quality, etc, of the heaters they are considering purchasing.  These pictures are complemented on the specific Range pages, by tables showing all available kW ratings, plus sub pages for each individual heater in that range.  We hope that the intuitive nature of the information allows ‘viewers’ to navigate to exactly what they want, then ring us and tell us what they want, rather than ringing ‘blind’ and asking if we supply something suitable to their needs.

The ‘OddBins’ page is also new, and is my attempt to sell off some of the accumulated bits and bobs at bargain prices, just to get rid of it and reclaim some space.  These are items, sometimes ordered in error, sometimes sent as samples by prospective suppliers, but just oddments that may fit somebodies exact requirements.  I’d never even heard of a ‘Hopper Heater’ but now you can buy one from us!

The website will grow, as will this blog, over the coming months and years, and we welcome any feedback, input, guidance, etc, from anyone with the interest and motivation to give it.

Just to repeat our enormous gratitude to all at Counsell.com for teaching a man to fish. Cheers!

Filed Under: website Tagged With: counsell.com, heating element, oddbins

Watts density explained

July 24, 2022 by Jamie Bristoll

I was going to provide a link to the best definition of watts density available on the web, but they are in very short supply, so here goes.

Watts density is the amount of heating energy emanating from any given amount of surface area of the hot part of an element.

In Imperial Britain and the States, this is usually described in terms of watts per square inch, but could be expressed (to keep the Eurocrats happy) as watts per square cm, mm, or indeed, meter. But why bother.

For 8mm diameter elements, simply divide the heating power output (in watts) of the given element by the length of hot section, ie. subtracting the cold ends at either end of the element, which can be 2″, 4″, 6″ or any custom length.

So, for the benefit of a simple example, if we have a 1kW, 54″ element with 2″ cold sections, we first take 4″ (2 ends of 2″) of cold off the total length of the element to give our hot section, 50″. Then we divide the power output of 1000w by 50″ to give us a watts density of 20w/in².

Now imagine we have a 1kW, 104″ element with 2″ cold ends (c/e), giving a hot length of 100″, do the maths as above, and you should get a watts density of 10w/in². Now, picture an inch square in your mind, or draw it if you prefer. Now, fill the box with 10 or 20 little boxes, happy faces, “watt monsters”, whatever crumbles your cookie. The size of the square doesn’t change between the 2 examples, but the size of the contents do, more watts per square inch means more squashed, little watts trying to get out of the same space. Now draw a box, mentally or on paper, and squeeze 40 of your little watt icons in that box. While your at it, have think about how long a 1kW element with 2″ c/e, would need to be to give a watts density of 40w/in²?

Different watts densities are requires for different applications. Some are set in stone, for obvious reasons, such as oil heaters needing to be no more than 12w/in², others are a little more flexible and open to “interpretation”. The gaffer always told me 5w/in² for elements in still air, but as can be seen below, grill elements can work at up to 42w/in². Fortunately, we don’t supply many of them, cos there wouldn’t be much of a guarantee at that top end. We are mainly suppliers of immersion heaters for water, with soft water being fine between 50-75w/in², but hard water being better suited to 40w/in² or below.

Our PEA Range is designed for forced air heating units, where the airflow needs to be 2m³/s. The simple way this is achieved is that every meter of element equates to 1kW, so if you want 3kW you have to bend/coil a 3m element into your available space.

Below is a detailed table of watts density in inches and equivalent cm, plus details of colour change and suitable applications.

W/in2 W/cm2
94 14.5 Immersed only
83 12.9 Immersed only
73 11.3 Immersed only
63 9.7 Immersed / High Arflow / Machined Fit
52 8.1 Immersed / High Arflow / Machined Fit
42 6.5 Equivalent to Grill / Radiant / Orange
31 4.8 Glow Red
21 3.2 Colour Change
10 1.6 Little or no Colour Change Still Air
9 1.5 Little or no Colour Change Still Air
8 13.0 Little or no Colour Change Still Air
7 1.1 Black Heat
6 1.0 Black Heat
5 0.8 Black Heat
4 0.6 Black Heat
3 0.5 Black Heat
2 0.3 Black Heat

To convert to other element diameters, please divide your solution as above by the following factors.  If you think of the 1kW, 54″ element with 2″ cold sections that we started with, only this one is 12mm in diameter, share our 20w/in² initial answer by the factor of 1.484, gives a watts density of 13.48w/in², which makes sense as a wider element will have more surface area for the 1000w to “escape” from.

mm
diameter
FACTOR
8 0.99
8.5 1.05
9.5 1.175
10 1.24
11 1.36
11.5 1.42
12 1.484
12.7 1.57
13.4 1.657
16 1.98
20 2.474
50.8 6.28

Filed Under: general information, Immersion Heater, unit conversions Tagged With: element bending, element diameter, heating element, immersed length, immersion heater

Immersion heater screwplug sizes

July 24, 2022 by Jamie Bristoll

various screwplug sizes
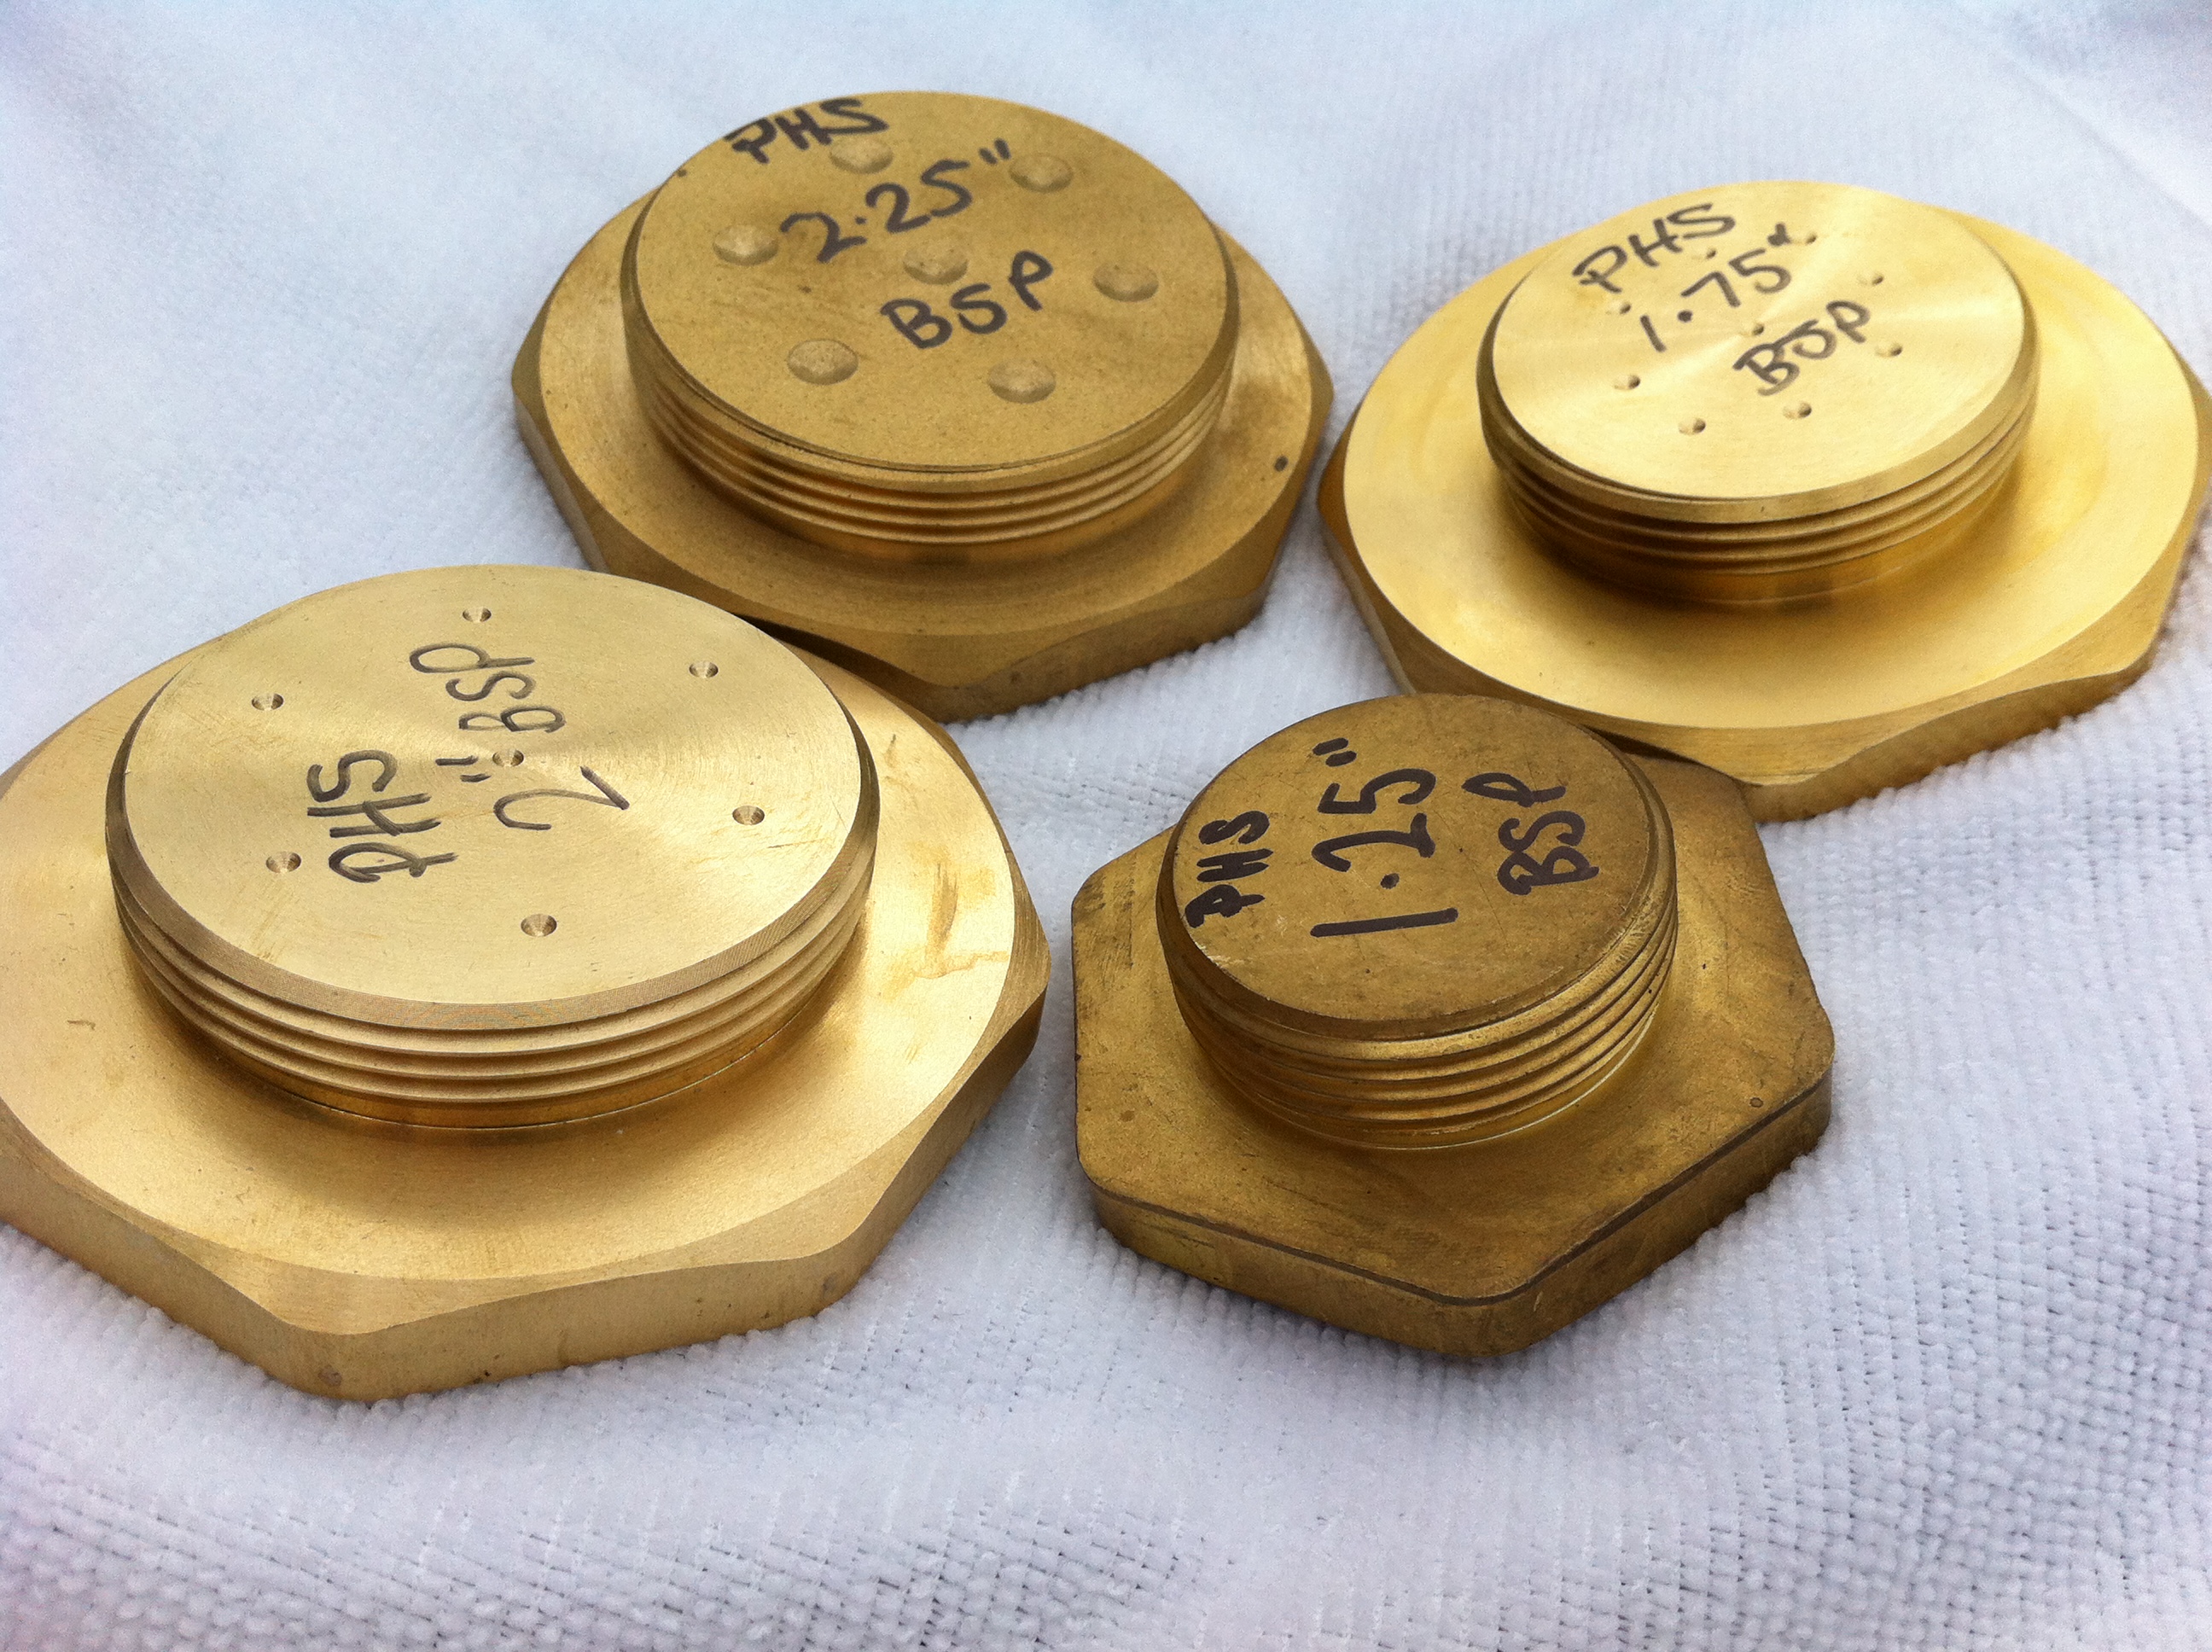
1.25″BSP, 1.75″BSP, 2″”BSP, 2.25″ SCREWPLUGS

Examples of some of the various screwplug sizes available, these are undrilled, therefore can be used as a blanking plate or for our customers who are unsure of their requirements, to screw into their socket before anything is manufactured bespoke. Very useful!

This is the simple version,

BSP
“
DIAMETER
ACROSS
THREAD
“
1/2 .825
5/8 .902
3/4 1.041
7/8 1.189
1 1.309
1 & 1/4 1.650
1 & 1/2 1.882
1 & 3/4 2.116
2 2.347
2 &1/4 2.537
2 & 1/2 2.95

…and this is the complicated version,

Thread Form Type Major Diameter mm d=D Pitch mm p Threads per inch tpi Pitch Diameter mm d2=D2 Minor Diameter Male Thd. d3 Thread Height H1 Tap Drill Diameter mm
1/8 “ BSPP/BSPF 9.728 0.907 28 9.147 8.566 0.581 8.7
1/4 “ BSPP/BSPF 13.157 1.337 19 12.301 11.445 0.856 11.6
3/8 “ BSPP/BSPF 16.662 1.337 19 15.806 14.95 0.856 15
1/2 “ BSPP/BSPF 20.955 1.814 14 19.793 18.631 1.162 19
5/8 “ BSPP/BSPF 22.911 1.814 14 21.749 20.587 1.162 20.75
3/4 “ BSPP/BSPF 26.441 1.814 14 25.279 24.117 1.162 24.5
7/8 “ BSPP/BSPF 30.201 1.814 14 29.039 27.877 1.162 28
1 “ BSPP/BSPF 33.249 2.309 11 31.77 30.291 1.479 30.5
1 1/8 “ BSPP/BSPF 37.897 2.309 11 36.418 34.939 1.479 35
1 1/4 “ BSPP/BSPF 41.91 2.309 11 40.431 38.952 1.479 39.5
1 3/8 “ BSPP/BSPF 44.323 2.309 11 42.844 41.365 1.479 41.5
1 1/2 “ BSPP/BSPF 47.803 2.309 11 46.324 44.845 1.479 45
1 3/4 “ BSPP/BSPF 53.746 2.309 11 52.267 50.788 1.479 51
2 “ BSPP/BSPF 59.614 2.309 11 58.135 56.656 1.479 57
2 1/4 “ BSPP/BSPF 65.71 2.309 11 64.231 62.752 1.479 63
2 1/2 “ BSPP/BSPF 75.184 2.309 11 73.705 72.226 1.479 72.5
2 3/4 “ BSPP/BSPF 81.534 2.309 11 80.055 78.576 1.479 79
3 “ BSPP/BSPF 87.884 2.309 11 86.405 84.926 1.479 85.5
3 1/4 “ BSPP/BSPF 93.98 2.309 11 92.501 91.022 1.479 91
3 1/2 “ BSPP/BSPF 100.33 2.309 11 98.351 97.372 1.479 97.75
3 3/4 “ BSPP/BSPF 106.68 2.309 11 105.201 103.722 1.479 104
4 “ BSPP/BSPF 113.03 2.309 11 111.55 110.072 1.479 110.5
4 1/2 “ BSPP/BSPF 125.73 2.309 11 124.251 122.772 1.479 123
5 “ BSPP/BSPF 138.43 2.309 11 136.951 135.472 1.479 136
5 1/2 “ BSPP/BSPF 151.13 2.309 11 149.651 148.172 1.479 148.5
6 “ BSPP/BSPF 163.83 2.309 11 162.351 160.872 1.479 161.5

I hope these are useful for reference purposes.

More importantly for us, on a daily basis, are the following limitations as to what will fit onto the smaller screwplug sizes. We deal with up to 2.25″ only, with 2.5″ being accommodated by fitting a brass adaptor to 2.25″ screwplug.

2.25″ TROMBONE 2 STAT
2″ TROMBONE 1 STAT
1.75″ TROMBONE 1 STAT
1.5″ 3 HAIRPINS 1 STAT
1.25″ 3 HAIRPINS NO STAT

Anything smaller than a 1.25″ screwplug will be limited to 1 element, having immediate implications for the achievable watts density.  Likewise, being limited to U bends only, makes reducing the watts density more problematic. Many domestic and commercial plumbing applications use 1.5″BSP, and are thus limited to 3 hairpins and only 1 stat pocket. maximising the immersed length of those U’s is all that can be done to reduce the watts density. To overcome the issue of only 1 stat pocket, we find ourselves increasingly selling dual control and cutout stats.

By hairpin, we mean a U bent element, and trombone indicates double looped. To determine what element is suitable, for U’s you merely double the maximum immersed length available, ie, 24″ immersed length will use u bent 48″ elements. However, if double looping is possible due to the screwplug size and other factors relating to the application (cleaning, etc), that 24″ maximum immersed length could be multiplied by up to 3.5, allowing the use of 84″ elements. See the watts density article to appreciate what a difference that will make. 48″ to 84″ almost double the hot element available, so is almost going to halve the watts density. A big issue on little screwplugs.

Filed Under: general information, Immersion Heater Tagged With: immersion heater, measure, screwplug size, thread

Ingress Protecion ratings for immersion heater terminal box

July 24, 2022 by Jamie Bristoll

What is Ingress Protection?

IP Explanation and Ratings
EN 60529 outlines an international classification system for the sealing effectiveness of enclosures of electrical equipment against the intrusion into the equipment of foreign bodies (i.e. tools, dust, fingers) and moisture. This classification system utilizes the letters “IP” (“Ingress Protection”) followed by two or three digits. (A third digit is sometimes used. An “x” is used for one of the digits if there is only one class of protection; i.e. IPX4 which addresses moisture resistance only.)
Degrees of Protection – First Digit
The first digit of the IP code indicates the degree that persons are protected against contact with moving parts (other than smooth rotating shafts, etc.) and the degree that equipment is protected against solid foreign bodies intruding into an enclosure.

  • 0 – No special protection.
  • 1 – Protection from a large part of the body such as a hand (but no protection from deliberate access); from solid objects greater than 50mm in diameter.
  • 2 – Protection against fingers or other object not greater than 80mm in length and 12mm in diameter.
  • 3 – Protection from entry by tools, wires, etc., with a diameter of thickness greater than 1.0mm.
  • 4 – Protection from entry by solid objects with a diameter or thickness greater than 1.0mm
  • 5 – Protection from the amount of dust that would interfere with the operation of the equipment.
  • 6 – Dust tight.

Degrees of Protection – Second Digit
The second digit indicates the degree of protection of the equipment inside the enclosure against the harmful entry of various forms of moisture (e.g. dripping, spraying, submersion, etc.)

  • 0 – No special protection.
  • 1 – Protection from dripping water.
  • 2 – Protection from vertically dripping water.
  • 3 – Protection from sprayed water.
  • 4 – Protection from splashed water.
  • 5 – Protection from water projected from a nozzle.
  • 6 – Protection against heavy seas, or powerful jets of water.
  • 7 – Protection against immersion.
  • 8 – Protection against complete, continuous submersion in water.

Filed Under: Immersion Heater Tagged With: dustt ingress, immersion heater, ingress protection, water ingress

How to choose a water immersion heater

July 23, 2022 by Jamie Bristoll

Remembering all of the aspects and considerations discussed on the “How to choose an immersion heater” page, water hardness must be taken into account when designing a water immersion heater.

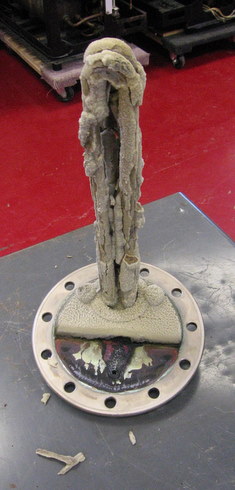
A detailed description of water hardness can be found HERE, but for the purposes of this blog, we will say that hard water has a higher concentration of calcium and magnesium which leads to limescale, which we are all familiar with in kettles, etc, within the home. Whilst merely being an inconvenience in the home, (if I can’t taste it in my tea, and remember not to look in the kettle when filling it, I can pretend it’s not there) it can be a real issue in commercial and industrial applications.

The problems are caused by the limescale deposits building up on the hot part of the elements. Once this process starts, it becomes self perpetuating, and indeed self accelerating, if not removed by jet washing or other means. Basically, the limescale build up prevents the heat getting away from the element, acting like an unwanted insulating jacket, increasing the element surface temperature, which in turn, attracts more deposits. An example of which is shown below, courtesy of gimmecoffee.com, which would perhaps be better used as a christmas tree than for making coffee!

heatingelement limescale

The easy way to maximise the working life of your immersion heaters, whether in a hard water area or not, is to minimize the Watts density. The article explains in detail a simple concept which we are using every day, maximise the element length THUS minimising the watts density THUS maximising the working life of the element, all other things being equal.

Filed Under: Immersion Heater Tagged With: heating element, immersion heater, water hardness, water immersion heater

How to choose a brewery immersion heater

July 17, 2022 by Jamie Bristoll

Remember all of the stuff that applies to all water immersion heaters, plus the key consideration for breweries is ease of cleaning.

Our existing ranges of immersion heater had limitations when used in brewery applications.

The II Range has many benefits, including bespoke screwplug size, immersed length, double stat pockets, etc, all with a 2 week leadtime, BUT as you can see from the images (particularly the 5th) our aim of maximising the length of 8mm diameter element, hence double looping rather than merely U bending, leads to a fair old ‘clump’ of elements.
Now, we are fully aware that all of you happy brewers are only boiling clean water (ha, ha) and are fastidious in cleaning thoroughly with a jet wash between every brew (chuckle, chuckle), but still, this ‘clump’ led to build up of ‘mystery stuff’ over time, leading to hot spots, element splitting and heater death.

So, in conjunction with one of our Italian suppliers, we designed the BI Range. These are a 10mm, U bent element, which has masses of gap between the elements (see pictures 2, 4 & 6) to enable efficient jet washing of the element to clean off any deposits. We will never be able to deviate from the specs on the website, as we have to buy in bulk with horrible lead times. But thankfully, we seem to have pitched the immersed lengths just right, and the watts density at around the 60w/in² mark, seems to be just right.

Even with the antique gear that some of you chaps are recycling for 21st century brewing, no one has needed any screwplug size other than 2.25″, tho I suppose we could throw on an adaptor to make them 2.5″ if needed.

So if you fancy buying an immersion heater that was actually designed for brewers, give me a call, on 07748 174049. Feedback from new and existing customers is greatly appreciated and collated at G##gle & FB.

Filed Under: Immersion Heater Tagged With: brewery immersion heater, immersed length, immersion heater for brewery, watts density

How to wire an immersion heater.

June 27, 2022 by Jamie Bristoll

Reference information about how to wire an immersion heater, based on information from processheatingservices.com.
WIRING DIAGRAM – http://processheatingservices.com/wp-content/uploads/2012/04/Wiring-Diagram-Immersion-Heaters1.pdf
IEE REGULATIONS – http://processheatingservices.com/wp-content/uploads/2013/05/IEE_Wiring_Cable_Colours_Leaflet.pdf

Filed Under: Immersion Heater, information videos Tagged With: how to wire an immersion heater, immersion heater wiring, wiring an immersion heater

  • 1
  • 2
  • Next Page »

Immersion Heaters UK

Midlands-based supplier of immersion heaters and heating elements to breweries and industry

Advertise here!

Get in touch at: sponsorship@heatingcalculators.com.

Or ring +44 7967 026293.

Credits

Unless otherwise stated, all written content on this site is ©Damian Counsell 2021-.

Images are courtesy of Unsplash and credited on their relevant pages.

If you spot a mistake, do please get in touch at: sponsorship@heatingcalculators.com.

Disclaimer

All data and calculators at Heating Calculators are provided as estimates and without warranty.

Nothing on this site constitutes a contract to provide advice or support.

Consult a professional before proceeding with any real-world work, especially where electricity is involved.

Copyright © 2023 · Agency Pro on Genesis Framework · WordPress · Log in